Featured

Crocheted Table Cloth

The way to handle crocheted table cloth is different from the way we handle table cloths made out of woven fabrics. Why? Crocheted table cloths are usually made out of fine thread usually cotton crochet thread #10. The recent table cloths that I have made are made up of size #3 cotton crochet thread. The finished crocheted table cloth is a lot heavier than a fabric table cloth of the same size. This weight of crocheted table cloth causes strain on stitches during handling, this is the reason why careful handling without too much tugging or pulling is necessary to prevent breakage of an individual stitch.

Some crochet thread are tightly winded or twisted and this is good. The tighter the twist, the stronger the strand of thread but unfortunately a lot of crochet thread are not twisted tightly and they easily break when strands making up the thread is separated. This is another reason why careful handling of the finished crocheted table cloth is necessary.

Featured

Pine Nut (CROCHET Stitch) Scarf

Video Tutorial Available by clicking this link:https://youtu.be/SRzKvO2PM4o

Tools And Materials:

Caron Simply Soft Yarn, weight category 4 or other yarn of the same weight category.


Crochet Hook:  Boye: 4.25mm to 5.00mm
Yarn or Tapestry Needle (to use for weaving in ends of yarn)

Gauge: 8 dc stitches = 2 inches; 4 dc rows = 2 inches (I’m using 4.25mm crochet hook and I LOVE THIS COTTON yarn, Weight category 4), The table below is based on this data.

The Scarf is 10 inches wide.

Estimated Number of RepeatsEstimated Length Of ScarfEstimated Number Of Yards Required
2040 inches341 yards
3060 inches511 yards
3570 inches596 yards
Number of repeats refers to how many times rows 2 through 5 is repeated to meet the length of the scarfNote:  Add 5 or more yards to the estimated number of yards required.

CROCHET TERMS, ABBREVIATIONS AND MEANINGS USED

R = row

Ch = Chain

Dc = double crochet

Slst = slip stitch

Sp = space

St = stitch

Sts = Stitches

Dcs = double crochets

Set = Group of stitches next to each other and may be separated by different stitch.

[ ] = Do the instructions as many times as indicated by the number that follows the symbol.

X = times

* * Repeat instructions between asterisks

Turning Chain (Beginning Chain of each row) = The very first stitch or stitches made at the start of the row.

The Pattern:

Ch 43.

R1:  Dc on 6th ch from hook, count this as 1ch and 1dc. [Dc on next st] 4x. NOTE: 1 group (set) MADE UP OF 5 DCs IS MADE.
*Ch3, skip 3 sts, [dc on next st] 5x .*   Repeat * * until the the last set of 5-dcs in the row, finish row with ch1, skip 1 st; dc on next st,   Note:  There are 4 ch-3 spaces between sets of 5dcs and 1 ch-1 on each side of the completed row.  Turn.

R2:  Ch3,  dc on next ch-1 sp.  * Ch1,  skip 1 dc, [dc on next dc] 3x; ch1; skip 1 dc,  3dcs on next ch-3 space. *  Repeat * * across. After the last set of 3dcs, finish this row with ch1, skip 1 dc, dc on next ch-1 sp; dc on last ch of turning chain which is the 3rd ch of begnning ch.  Turn.

R3: Ch2, dc on next dc, [Note: Beginning crocheters, please see note 1 below], dc on ch-1 sp; *ch3, skip next 3dcs, dc on next ch-1 sp; [dc on next dc] 3x, dc on next ch-1 sp. *   Repeat * * across. After the last ch3,  dc on next ch-1 sp, dc on next dc, dc on 2nd ch of turning chain.  Note:  There are 4 sets of 5 dcs; 5 sets ch-3 spaces and 3 dc(s) on each side (edge) of this row.  Turn.

R4: Ch2, dc next dc. *Ch1, 3dcs on next ch-3 sp. Ch1, skip 1 dc, [dc on next dc] 3x, * Repeat * * across.  After the last set of 3 dc(s) of this row, ch1, skip 1 dc, dc on next dc, dc on  2nd ch of turning ch.  Note: There are 9 groups (sets) of 3 dcs and 10 ch-1 spaces between sets of 3 dcs when this row is completed. Turn.

R5: Ch3, *dc on next ch-1 sp, [dc on next dc] 3x; dc on next ch-1 sp, ch3.* REPEAT * * across. After the last set of 5 dcs, finish this row with Ch1, skip 1 dc; dc on 2nd ch of turning chain. Note: There are 5 sets of 5dcs and 4 sets of ch-3 stitches. Turn.


Repeat  R2 to R5 over and over until desired length is met. Fasten off and weave in yarn ends.

Notes:

  1. When working on rows of stitches, The next stitch after the turning ch (ch2) is not the stitch to which the next stitch will be made but on the one next to it so it appears like you are skipping a stitch but this is not a skip, it just appears like that.

Featured

Condo Living

10 years ago I could not imagine myself living in a Condo. Just the thought of it makes me feel enclosed but the time comes when my husband and I decided that condo living is the best option for us to meet our needs. We are both in our 60’s and the demand of maintaining a yard became too much of a challenge. I thought that I would miss the open space surrounding our dwelling once we move to a Condo but to my surprise, I don’t miss that at all. Not that I did not love the home we sold in order to obtain the one we have now. It was a wonderful place.

It’s been four years since we decided to move in the condo unit we are living now and we are so glad we have made that decision. I can still enjoy my hobby of gardening but in a very much scaled down version of my gardening before. A small space to garden takes all the available energy I have so this place is fitted to my needs.

Featured

My Garden 2021

I missed not having a garden last year so this year despite the delayed ideal planting condition, I managed to put a mixed Vegetable and flower garden in my tiny backyard. They are just growing fairly well since June. It had been very cold through late spring so most of the seedlings that I planted indoor did not survive. but I am happy with what plants I have now. I have some flowers and vegetables planted in flower pots as well as directly in the soil.

I harvested my first cucumber yesterday and ate it! It was so good. How much more I enjoyed eating it compared to the ones I bought from the store!

My cucumber plant!

this cucumber is planted in a 15 galon pot and it seems to be thriving.

I also planted some Moringa Oleifera plants, some in pots and some in soil. I’m testing to see where will they thrive best, in the ground or in the pot. I’m hoping that by the end of summer they are big enough so I can harvest their leaves and use them as vegetables.

Some of their leaves had turned yellow after I used an automatic plant feeder sprayer. The gadget seemed not to properly regulate the amount of fertilizer delivered so from now on I will apply fertilizer manually. I hope they survive.

I also bought my first Plumeria plant this year. I’ve been wanting one for a long time but the thought of it not surviving my zone 6 environment had prevented me from ordering a cutting. It arrived looking hopeless, nothing but a wilted plant limb with small brown wilted leaves but today, it is looking better and it has few healthy looking leaves growing

I also planted Taro plant …

….yes, you guessed it lol! It is planted in a baby’s bassinet! What I liked about planting it in the bassinet is that, the bassinet has a draining hole at the bottom which I can choose to open or close. Taro plant tolerates soggy soil so judging by the way it looks, it seems to be liking it.

I can go on and on about individual plants in my garden but let me just show them to you. Thank you for reading this post and may your Garden offer you blissful day everyday!

Featured

Wake Up!!!

I am retired so most of the times there is no strong motivation to wake up early and prepare for the day but one reason that encourages me to get up early is gardening, specially these days when it gets so hot by 10 am. Thanks for the rain last night, it’s a bit cooler this morning but I can already feel the humidity.

My small garden is thriving well! The birds are singing, serenading me while I sit on our back porch drinking coffee. They sing louder when I put their morning seeds in their feeder, so it seems. I noticed that there are actually Chipmonks that share with the birds. I saw the other one coming from our neighbor’s yard run toward the feeder while the other one that lives in our backyard was already feeding.

One of these days I will buy a bird Cam so that I can get a good photograph of birds/Chipmonks that come to our yard. I can’t take good photos of them up close because they are wild and skittish. As long as I sit still they continue to feed but any slight movement will cause them to go away.

I have harvested fruits twice already from my Roma and Red Beefsteak tomatoes. The Roma tomatoes are doing excellent despite the fact that they are planted in a flower pot and only getting 4-5 hours of direct sunlight.

Roma Tomato
Two Roma tomatoes planted next to the wall.

How To Make A Slip Stitch In Crochet

How To Make A Slip Stitch
Slip Stitch:  A slip stitch is the shortest of all working stitches such as: Single crochet (Sc), double crochet (dc), triple crochet (tr) and other crochet stitches that are variations of the above mentioned working crochet stitches.  It is useful in ending a crochet worked in the round and also in working up to where the next round of crochet work should begin.

To make a slip stitch (slst) follow the steps below:

To  do the slip stitch, there should already be some kind of existing stitches beforehand into which the slip stitch should be made. 

1.  Insert hook on next stitch or on a stitch that a crochet pattern specifies.
2.  Yo,
3.  Draw up yo that you made on step 2 through the stitch or space where you inserted hook and  on loop on hook. One Slip Stitch made.

Repeat Steps 1 to 3 to make another slip stitch on the next stitch.

6 Pointed Star Lace Stitch Border

After making the star lace stitch, add the border, following written instructions below and or watching the video tutorial.

Non Standard Crochet Terms And Definitions:

[ ] Repeat or follow instructions inside the bracket

M-> Mark the stitch that follows this symbol ( It is usually used to mark the beginning stitch of the round).

Standard Crochet Terms And Definitions:

Shell Stitch = 3dc(s)-ch3-3dc(s) on specified space or stitch

Border Round 1:

After making enough rows of the 6-Pointed Star Stitch Pattern, do not break yarn. Count the number of V spaces on the side which rows start with V stitches. Duplicate the same number of spaces on each of remaining 3 sides of the square by adding ch5-sc on marked stitches. Distribute the ch5-sc stitches evenly along all sides. Do this by marking the corners and spaces where the sc should fall to meet or match the total number of spaces of the V side of the crocheted piece. Please See video tutorial on this topic for actual demo on how the marking is done.

Starting at corner, M->sc into the corner space then make another sc on the same space. Note: The marked sc is the beginning of this round and part of the corner stitch. * [Ch5, sc on next marked space] Repeat [ ] across. After the last ch5 before the corner, make 3sc(s) at the marked corner space*. Repeat * * around. After the last ch5 of the round, make a sc on the corner then slst on the marked beginning sc.

Border Round 2:

*Ch7, skip next sc, sc on next st. Note: Ch7 corner stitch is made. [Ch5-sc on next ch5-space] repeat [ ] across; after the last ch5 before the next corner, sc on the next sc*. Repeat * * around. After the last ch5 of the round slst on top of slst where beginning ch-7 is attached.

Border Round 3:

Slst on each of next 2 sts. Sc into the space, M->ch3 to count as a dc and part of corner shell, 2dc(s)-ch3-3dc(s) on same space. Note: Corner shell is made. [Ch1-3dc(s) on next ch5-space], repeat [ ] across; *after the last ch1 before the corner shell, 3dc(s)-ch3-3dc(s) on the ch3 of the shell stitch, [ch1-3dc(s) on next ch5-space], repeat [ ] across* Repeat * * around. After the last ch1 of the round, slst on 3rd ch of beginning ch3.

Border Round 4:

M->Ch3 to count as a dc, ch1 to count as the chain between sets of 3dc(s). 3dc(s)-ch3-3dc(s) on ch3-space of corner shell. Note: Corner shell is made. *[ch1-3dc(s) on next ch1-space], repeat [ ] across, after last ch1 before the corner shell, 3dc(s)-ch3-3dc(s) on next ch3-space of corner shell*. Repeat * * around. After the last ch1 of the round, 2dc(s) on the ch1-space where beginning ch3 is attached then slst on 3rd ch of marked beginning ch3.

Repeat Round 4 as many times needed to meet the desired measurement of the project.

6-Pointed Star Crochet Pattern

Related Youtube videos: https://youtu.be/UJbeGsmzLUw

Suggested Project:

Scarf, Curtain, Table Cloth, Pillow Cover, Decorative Lace afghan, etc.

Tools And Materials: Yarn: weight category 3, “Sugarwheel Cotton Solids” by Yarn Bee.

Crochet Hook (I used): 3.25 mm, steel by Boye

Crochet Terms And Explanations:

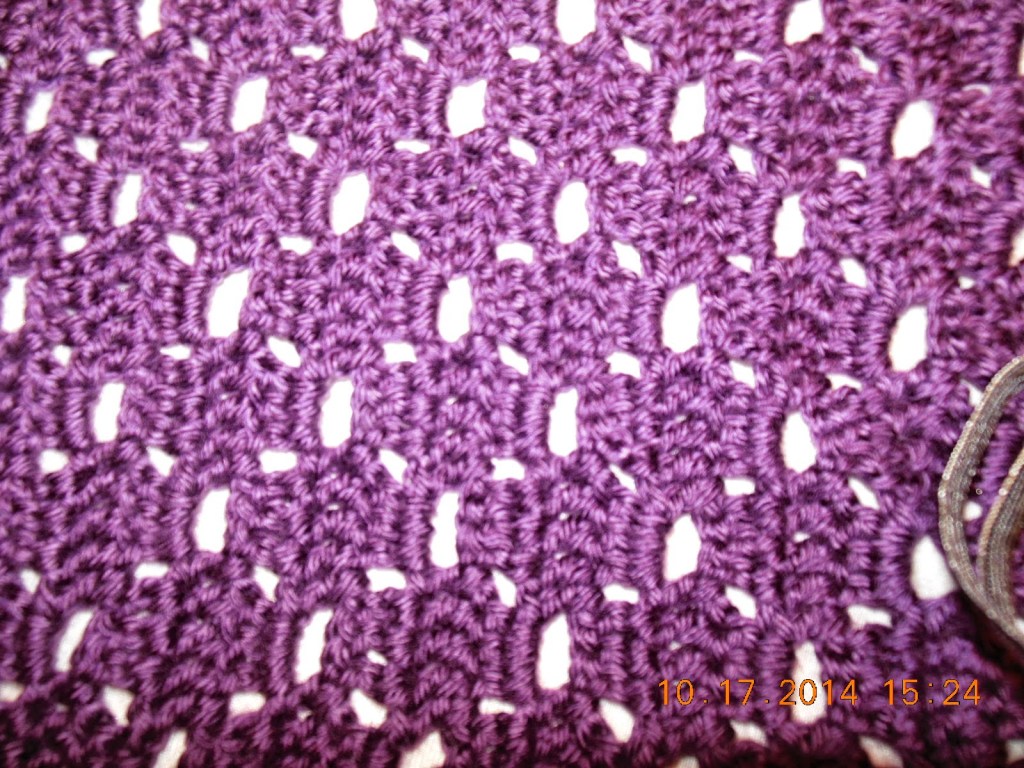
V Stitch = How to do for this pattern: Dc-ch5-dc on same stitch. Note: on last row of project, the ch 5 between V posts is changed to ch3. This is to make the stitches at the edge be straight and not scalloped.

How To calculate Initial chains: I used multiple of 8 chs +8. on this swatch, example, (8×1) or 1 repeat of 8 stitches + 8. Why add 8? 1= for the extra stitch needed at end of first row. 7 = the extra chains needed at the edge of the pattern to make the first V Stitch of the row (2 side ch(s) + 5 chs between V posts).

1 Repeat of 8 sts = (apx) Approximate 1.5 inches (Width). This (width) will also be determined by how loose or tight your stitches are. I tend to relax while crocheting and therefore my stitches are loose.

How To Determine The Number Of Repeats Needed For Specific Project.

1. Make 4 rows of this sample swatch

2. Measure the width (from beginning to end of row 2 or 3) of the swatch you made.

Note on how to measure the swatch: The V stitch of the star pattern will tend to close, therefore you need to pull the swatch horizontally to open these V stitches so that they form the 6-pointed star, then measure the width of the swatch.

3. Use this swatch Measurement to determine how many repeats would equal to the width desired.

Swatch Pattern:

(8×1)+8=16 ch(s) to make this small swatch.

Row 1: Dc on 8th ch from hook. Note: V Stitch with ch-5 between dc posts is made. * Ch3, skip next 3ch(s), make an incomplete dc on next ch, sk next 3 ch(s), dc on the next ch, and complete the dc2tog stitch by yo, pull up through 2 loops on hook; yo and pull through all 3 loops on hook. Note: Inverted V is made. From here until end of row, the dc2tog or inverted V stitch will be made this way. If this is the end of row, follow appropriate instructions with double asterisks (**) below, otherwise, ch3, skip next 3ch(s), V stitch on next ch*. Repeat * * across.

At end of row select which one of the following (**If) condition is true then follow the instructions associated with that (**If) statement.

**If V st is the final st of row, do 1 dc only and turn.

**If Inverted V is the final stitch of the row then turn.

**If Inverted V is the final stitch of row but there is not enough chs to finish it then just do dc on last ch and turn.

Note: Starting Row 2, Each V stitch along the row must always be followed by sc and each sc must always be followed by V stitch except at end of row, when the last stitch of the current row is a V stitch then 1 dc takes the place of the V stitch.

Row 2: Ch7, skip 3ch(s)

If next st after skipped sts is a sc then V st on this sc, ch3,

If next st after skipped sts is a ch-5 space then dc on same st where current st is attached, ch3,

*sc on next ch 5 sp, ch3,{if the next st after ch3 is the end of row follow conditional (**if) instructions below}, otherwise V stitch on top of next dc2tog stitch, ch3*. Repeat * * across.

At end of row:

**If V st is the final st of row then do 1 dc only and turn.

**If sc is the final st of current row then sc on 4th ch of ch-7 sp and turn.

Row 3: Ch7, skip 3 ch(s),

** If next st after skipped sts is a sc then V st on this sc,

**If next st after skipped sts is a ch-5 space then dc on same st where current st is attached,

ch3, *sc on next ch 5 sp, {If at the end of row, follow approprate (**If) instructions, otherwise, ch3, V stitch on top of next sc, ch3*. Repeat * * across.

At end of row:

**If V is the final st of the crrent row after the ch3, do 1 dc only on the 4th ch of ch-7 space and turn.

**If sc is the last st of current row then sc on 4th ch of ch-7 and turn.

Row 4 to Row before last Row, repeat Row 3.

Last Row: Repeat the same Row 3 instructions except do dc-ch3-dc for V stitches.

I hope you enjoy making a project tailored to your needs from this pattern.

Where Not To Plant Snowball Bush

I knew a lady who had a beautiful Snowball plant, I did not understand why she kept cutting the plant down to about 24 inches from the ground in Spring before the plant begins to bloom.  I kept telling her to wait at least until after it blooms out before cutting it down but she would not listen.  I finally figured out (or at least I think so), that the reason she does this, is that she is tired of sweeping the fallen petals off her back porch.  The Snowball is planted close to her porch which is almost ground level, so the wind carries most of the fallen petals inside her porch.

Lesson:  Do not plant a Snowball  in areas where the fallen flowers will be unsightly such as close to door ways, porches, patios or driveways, unless you don’t mind sweeping everyday while the plant is blooming.

I have mine planted next to our driveway but I don’t mind the fallen petals scattered over my driveway and most of the petals fall in the grassy area below the drive way.  I planted the Snowball there to prevent soil erosion from the driveway which is situated in a sloping area.  Snowball flowers are very attractive and fabulous in Spring Bouquets.

It is very easy to propagate Snowball bush.  All you have to do is to chose a drooping branch that is close to the ground.  Fill a medium size pot with potting soil and using a garden pin to fix the selected branch, (it should be flexible enough so that it does not break when bent), into the dirt inside the pot.  Use A stone or any heavy object to keep the branch pegged into the potting soil.   Keep the soil in the pot moist.  The pegged plant will develop roots and it should be ready to be cut from the mother plant and be transplanted by the following spring.


Comments are always welcome.  Thanks for stopping by.